K8S集群安装动态存储 GlusterFS
K8S 存储介绍
简介
在 K8S 中,对容器所应用的存储资源抽象为存储卷 Volume。它的生命周期与 POD 相同,POD 中的容器如果要使用某个 Volume,需要通过
volumeMounts来指定某个 volume 或者 多个 volume 挂载到容器的目录或文件。那么就可以从容器中访问 volume 中的数据。K8S支持内部资源对象类型、开源共享存储类型等,K8S管理宿主机的本地存储类型,
EmptyDir和HostPath,前者为临时目录,后者为宿主机目录。内部资源对象最常见的就是持久化存储 PV,开源共享存储类型就有很多,比如:- CephFS 开源共享存储系统
- Glusterfs 开源共享存储系统
- CSI(Container Storage Interface,容器存储接口)由存储提供商提供驱动程序和管理程序
- FlexVolume 一种基于插件式驱动的存储
- 其他
EmptyDir是在 pod 被调度到 node 时创建,在初始状态下目录中是空的,与 pod 的生命周期相同。
持久卷
K8S 通过 Persistent Volume(PV) 和 Persistent Volume Claim(PVC) 两个资源对象来管理存储的资源。这样做的好处是屏蔽了对底层存储的实现细节。PV 是对存储资源的一种抽象,PV 是由管理员创建和配置的,与具体的厂商有关。PV 的生命周期与 POD 的生命周期分开的。
PVC 是对 PV 资源的一种申请。但是 PVC 无法表明哪种存储是什么样的特性,应用程序会根据自己的特点去选择相应的存储资源,包括读写的速度啊,并发性能等。 K8S 引入了一个新的资源对象
StorageClass用来标记存储资源的特点和性能,动态选择合适的 PV 资源。管理员通过StorageClass来定义存储资源的 profile,然后应用程序根据自己的需求去申请相应的存储资源就可以了。另外从 1.9 版本开始,K8S 引入了 CSI 机制,就是提供了一个借口,具体实现由各自存储厂商实现,解耦存储相关的代码,之前的存储代码是内嵌的,必须要修改代码才能提供相应的存储资源。
pod 通过
persistentVolumeClaim使用PVC,会通过定义的 StorageClass 来动态绑定需要使用的存储类型,如果没有 PV,那么 PVC 会处在Pending的状态, 删除 PVC 时,只有与其绑定的 POD 删除时,才会删除,删除 PV 时,只有与其绑定的 PVC 删除了才会被删除。PVC 和 PV 是一对一的绑定关系。POD 使用 PVC
系统在 pod 所在的 namespace 中找到 pod 所配置的 PVC,然后再通过 PVC 绑定 PV,将 PV 存储挂载到 pod 所在的 node 的目录下,最后再将 node 的目录挂载到 pod 的容器内。
GlusterFS
安装 glusterfs
在用于 GlusterFS 的 node 上安装 glusterfs,执行:
yum install glusterfs glusterfs-fuse然后给相应的 node 打上一个标签,为了将 GlusterFS 容器定向部署到安装了 GlusterFS 的 node 上。执行:
kubectl label node node02 storagenode=glusterfskubectl label node node03 storagenode=glusterfskubectl label node node04 storagenode=glusterfs删除标签用命令:
kubectl label node <node-name> <label-key>-创建 GlusterFS 管理服务
GlusterFS 以
DaemonSet方式进行部署,内容如下:glusterfs-daemonset.yaml
1
2
3
4
5
6
7
8
9
10
11
12
13
14
15
16
17
18
19
20
21
22
23
24
25
26
27
28
29
30
31
32
33
34
35
36
37
38
39
40
41
42
43
44
45
46
47
48
49
50
51
52
53
54
55
56
57
58
59
60
61
62
63
64
65
66
67
68
69
70
71
72
73
74
75
76
77
78
79
80
81
82
83
84
85
86
87
88
89
90
91
92
93
94
95
96
97
98
apiVersion: apps/v1
kind: DaemonSet
metadata:
name: glusterfs
labels:
glusters: damonset
annotations:
description: GlusterFS DaemonSet
tags: glusterfs
spec:
selector:
matchLabels:
glusterfs-node: pod
template:
metadata:
name: gulsterfs
labels:
glusterfs-node: pod
spec:
nodeSelector:
storagenode: glusterfs
hostNetwork: true
containers:
- image: gluster/gluster-centos:latest
name: glusterfs
volumeMounts:
- name: glusterfs-heketi
mountPath: "/var/lib/heketi"
- name: glusterfs-run
mountPath: "/run"
- name: glusterfs-lvm
mountPath: "/run/lvm"
- name: glusterfs-etc
mountPath: "/etc/glusterfs"
- name: glusterfs-logs
mountPath: "/var/log/glusterfs"
- name: glusterfs-config
mountPath: "/var/lib/glusterd"
- name: glusterfs-dev
mountPath: "/dev"
- name: glusterfs-misc
mountPath: "/var/lib/misc/glusterfsd"
- name: glusterfs-cgroup
mountPath: "/sys/fs/cgroup"
readOnly: true
- name: glusterfs-ssl
mountPath: "/etc/ssl"
readOnly: true
securityContext:
capabilities: {}
privileged: true
readinessProbe:
timeoutSeconds: 3
initialDelaySeconds: 60
exec:
command:
- "/bin/bash"
- "-c"
- systemctl status glusterd.service
livenessProbe:
timeoutSeconds: 3
initialDelaySeconds: 60
exec:
command:
- "/bin/bash"
- "-c"
- systemctl status glusterd.service
volumes:
- name: glusterfs-heketi
hostPath:
path: "/var/lib/heketi"
- name: glusterfs-run
hostPath:
path: "/run"
- name: glusterfs-lvm
hostPath:
path: "/run/lvm"
- name: glusterfs-etc
hostPath:
path: "/etc/glusterfs"
- name: glusterfs-logs
hostPath:
path: "/var/log/glusterfs"
- name: glusterfs-config
hostPath:
path: "/var/lib/glusterd"
- name: glusterfs-dev
hostPath:
path: "/dev"
- name: glusterfs-misc
hostPath:
path: "/var/lib/misc/glusterfsd"
- name: glusterfs-cgroup
hostPath:
path: "/sys/fs/cgroup"
- name: glusterfs-ssl
hostPath:
path: "/etc/ssl"在 master 节点上执行,
kubectl create -f glusterfs-daemonset.yaml, 然后查看是否生成资源,查看 glusterfs 的服务容器的pod:1
2
3[root@node01 k8s]# kubectl get po
NAME READY STATUS RESTARTS AGE
glusterfs-wvlw2 1/1 Running 1 (15m ago) 20m然后再 describe 一下 pod,我本地有四个节点,一个master(node01),三个 worker(node02,node03,node04),worker 上都安装了 GlusterFS 服务,那么 pod
glusterfs-wvlw2应该只在 node03 上存在,yaml 如下:1
2
3
4
5
6
7
8
9
10
11
12
13
14[root@node01 k8s]# kubectl describe pod glusterfs-wvlw2
Name: glusterfs-wvlw2
Namespace: default
Priority: 0
Node: node03/192.168.170.113 >>>>>>>>> node03 上
Start Time: Wed, 03 Nov 2021 15:51:21 +0800
Labels: controller-revision-hash=6ffb8b879
glusterfs-node=pod
pod-template-generation=1
Annotations: <none>
Status: Running
IP: 192.168.170.113
IPs:
IP: 192.168.170.113创建 Heketi 服务
Heketi 提供了 RESTful API 管理 GlusterFS 卷的框架,方便对 GlusterFS 的管理。
给 Heketi 创建一个 ServiceAccount,完成 RBAC 授权
kubectl create -f heketi-rbac.yaml,yaml 内容如下:heketi-rbac.yaml
1
2
3
4
5
6
7
8
9
10
11
12
13
14
15
16
17
18
19
20
21
22
23
24
25
26
27
28
29
30
31
32
33
34
35
36
37
38
39
40
apiVersion: v1
kind: ServiceAccount
metadata:
name: heketi-service-account
apiVersion: rbac.authorization.k8s.io/v1
kind: Role
metadata:
name: heketi
rules:
- apiGroups:
- ""
verbs:
- get
- list
watch
resources:
- endpoints
- services
- pods
- apiGroups:
- ""
verbs:
- create
resources:
- pods/exec
apiVersion: rbac.authorization.k8s.io/v1
kind: RoleBinding
metadata:
name: heketi
roleRef:
apiGroup: rbac.authorization.k8s.io
kind: Role
name: heketi
subjects:
- kind: ServiceAccount
name: heketi-service-account
namespace: default部署 heketi 服务
kubectl create -f heketi-deployment-svc.yaml,yaml 内容如下:heketi-deployment-svc.yaml
1
2
3
4
5
6
7
8
9
10
11
12
13
14
15
16
17
18
19
20
21
22
23
24
25
26
27
28
29
30
31
32
33
34
35
36
37
38
39
40
41
42
43
44
45
46
47
48
49
50
51
52
53
54
55
56
57
58
59
60
61
62
63
64
65
66
67
68
69
70
71
72
73
74
75# heketi-deployment-svc.yaml
---
apiVersion: apps/v1
kind: Deployment
metadata:
name: heketi
labels:
glusterfs: heketi-deployment
deploy-heketi: heketi-deployment
annotations:
description: Defines how to deploy Heketi
spec:
replicas: 1
selector:
matchLabels:
name: deploy-heketi
glusterfs: heketi-pod
template:
metadata:
name: deploy-heketi
labels:
name: deploy-heketi
glusterfs: heketi-pod
spec:
serviceAccountName: heketi-service-account
containers:
- image: heketi/heketi
name: deploy-heketi
env:
- name: HEKETI_EXECUTOR
value: kubernetes
- name: HEKETI_FSTAB
value: "/var/lib/heketi/fstab"
- name: HEKETI_SNAPSHOT_LIMIT
value: "14"
- name: HEKETI_KUBE_GLUSTER_DAEMONSET
value: "y"
ports:
- containerPort: 8080
volumeMounts:
- mountPath: "/var/lib/heketi"
name: db
readinessProbe:
timeoutSeconds: 3
initialDelaySeconds: 3
httpGet:
port: 8080
path: "/hello"
livenessProbe:
timeoutSeconds: 3
initialDelaySeconds: 3
httpGet:
port: 8080
path: "/hello"
volumes:
- name: db
hostPath:
path: "/heketi-datae"
---
kind: Service
apiVersion: v1
metadata:
name: heketi
labels:
glusterfs: heketi-service
deploy-heketi: support
annotations:
description: Expose Heketi Service
spec:
selector:
name: deploy-heketi
ports:
- port: 8080
targetPort: 8080
name: deploy-heketi
通过 Heketi 管理 GlusterFS 集群
在使用 Heketi 之前,需要配置文件来表明 GlusterFS 集群的信息,用 topology.json 来表示,如下所示。
其中manage表示主机名,storage表示 IP,devices表示未创建文件系统的裸磁盘(可以关闭虚拟机,然后设置虚拟机,增加一块磁盘,打开虚拟机之后,lsblk, 就能看到/dev/sdb的磁盘),这样 Heketi 自动完成 PV(Physical Volume)、VG(Volume Group)和 LV(Logical Volume)的创建。topology.json
1
2
3
4
5
6
7
8
9
10
11
12
13
14
15
16
17
18
19
20
21
22
23
24
25
26
27
28
29
30
31
32
33
34
35
36
37
38
39
40
41
42
43
44
45
46
47
48
49
50
51
52
53
54
55
56
57{
"clusters": [
{
"nodes": [
{
"node": {
"hostnames": {
"manage": [
"node02"
],
"storage": [
"192.168.170.112"
]
},
"zone": 1
},
"devices": [
"/dev/sdb"
]
},
{
"node": {
"hostnames": {
"manage": [
"node03"
],
"storage": [
"192.168.170.113"
]
},
"zone": 1
},
"devices": [
"/dev/sdb"
]
},
{
"node": {
"hostnames": {
"manage": [
"node04"
],
"storage": [
"192.168.170.114"
]
},
"zone": 1
},
"devices": [
"/dev/sdb"
]
}
]
}
]
}进入到 Heketi 容器,使用 Heketi-cli 执行命令创建
kubectl exec -it heketi-c7cbcd99f-5fr87 -- /bin/bash,创建上面的 topology.json 文件,然后执行命令:1
2
3
4
5
6
7
8
9
10
11
12
13
[root@heketi-c7cbcd99f-5fr87 /]# export HEKETI_CLI_SERVER=http://localhost:8080
[root@heketi-c7cbcd99f-5fr87 /]# heketi-cli -s $HEKETI_CLI_SERVER --user admin --secret 'My Secret' topology load --json=topology.json
[root@heketi-c7cbcd99f-5fr87 /]# heketi-cli topology load --json=topology.json
Creating cluster ... ID: a1960a285b7314517477b178f4babbcc
Allowing file volumes on cluster.
Allowing block volumes on cluster.
Creating node node02 ... ID: 9b6fa5213ef920f428a60bd199456c5a
Adding device /dev/sdb ... OK
Creating node node03 ... ID: 54abf4963294de9bec989f5b641fa1e2
Adding device /dev/sdb ... OK
Creating node node04 ... ID: d8573f0c2506db8cca6c0cfeb86f4ac8
Adding device /dev/sdb ... OK如果直接执行命令
heketi-cli topology load --json=topology.json会出现一下错误:Error: Unable to get topology information: Invalid JWT token: Token missing iss claim
需要加上 user 和 secret,可以从/etc/heketi/heketi.json文件中拿到值。
也可以先加入环境变量,然后就可以直接执行:heketi-cli topology load --json=topology.json1
2
3export HEKETI_CLI_USER=admin
export HEKETI_CLI_SERVER=http://localhost:8080
export HEKETI_CLI_KEY=My\ Secret查看 Heketi 创建的 topology 的信息,执行命令:
heketi-cli topology --user admin --secret 'My Secret' infoHeteki 的 topology 信息
1
2
3
4
5
6
7
8
9
10
11
12
13
14
15
16
17
18
19
20
21
22
23
24
25
26
27
28
29
30
31
32
33
34
35
36
37
38
39
40
41
42
43
44
45
46
47
48
49[root@heketi-c7cbcd99f-5fr87 /]# heketi-cli topology --user admin --secret 'My Secret' info
[root@heketi-c7cbcd99f-5fr87 /]# heketi-cli topology info
Cluster Id: a1960a285b7314517477b178f4babbcc
File: true
Block: true
Volumes:
Nodes:
Node Id: 54abf4963294de9bec989f5b641fa1e2
State: online
Cluster Id: a1960a285b7314517477b178f4babbcc
Zone: 1
Management Hostnames: node03
Storage Hostnames: 192.168.170.113
Devices:
Id:28b4f9a350aff4c88ab7ffcab79764eb State:online Size (GiB):19 Used (GiB):1 Free (GiB):18
Known Paths: /dev/disk/by-path/pci-0000:00:10.0-scsi-0:0:1:0 /dev/sdb
Bricks:
Node Id: 9b6fa5213ef920f428a60bd199456c5a
State: online
Cluster Id: a1960a285b7314517477b178f4babbcc
Zone: 1
Management Hostnames: node02
Storage Hostnames: 192.168.170.112
Devices:
Id:54d66971acb11982b48dcbccf6d2e29c State:online Size (GiB):19 Used (GiB):0 Free (GiB):19
Known Paths: /dev/disk/by-path/pci-0000:00:10.0-scsi-0:0:1:0 /dev/sdb
Bricks:
Node Id: d8573f0c2506db8cca6c0cfeb86f4ac8
State: online
Cluster Id: a1960a285b7314517477b178f4babbcc
Zone: 1
Management Hostnames: node04
Storage Hostnames: 192.168.170.114
Devices:
Id:c49d4d978b189c2347778e72b411d52d State:online Size (GiB):19 Used (GiB):0 Free (GiB):19
Known Paths: /dev/disk/by-path/pci-0000:00:10.0-scsi-0:0:1:0 /dev/sdb
Bricks:上面的信息可以看到,磁盘的大小,剩余空间,但是 GlusterFS 的 Volume 和 Brick 还没有创建。
关于 GlusterFS 中的一些术语:
- Brick: GlusterFS 的最小存储单元,表示授信存储吃里面的导出目录,格式:
SERVER:EXPORT,比如:node02:/exports/data/ - Volume: 一组 Bricks 的逻辑集合
- Brick: GlusterFS 的最小存储单元,表示授信存储吃里面的导出目录,格式:
定义 StorageClass
定义个 StorageClass,来使用和配置 GlusterFS 提供的存储。内容如下:
storageclass-gluster-heketi.yaml 1
2
3
4
5
6
7
8
9
10
11apiVersion: storage.k8s.io/v1
kind: StorageClass
metadata:
name: gluster-heketi
provisioner: kubernetes.io/glusterfs
parameters:
resturl: "http://10.100.161.204:8080"
restauthenabled: "true"
restuser: "admin"
secretNamespace: "default"
secretName: "heketi-secret"在 master 上执行创建命令:
1
2
3
4
5[root@node01 k8s]# kubectl create -f storageclass-gluster-heketi.yaml
storageclass.storage.k8s.io/gluster-heketi created
[root@node01 k8s]# kubectl get sc
NAME PROVISIONER RECLAIMPOLICY VOLUMEBINDINGMODE ALLOWVOLUMEEXPANSION AGE
gluster-heketi kubernetes.io/glusterfs Delete Immediate false 15s上面的 SC 中,还需要定义一个 secret 来授权访问 Heketi 的 API,不然调用
POST /Volume会报错。heketi-secret.yaml定义如下:1
2
3
4
5
6
7apiVersion: v1
kind: Secret
metadata:
name: heketi-secret
data:
key: TXkgU2VjcmV0
type: kubernetes.io/glusterfs # 必须定义定义 PVC
通过上面的步骤,我们已经准备好了 PV,现在可以定义一个 PVC 来申请使用 PV 中的资源。定义一个 PVC:
pvc-gluster-heketi.yaml 1
2
3
4
5
6
7
8
9
10
11apiVersion: v1
kind: PersistentVolumeClaim
metadata:
name: pvc-gluster-heketi
spec:
storageClassName: gluster-heketi
accessModes:
- ReadWriteOnce
resources:
requests:
storage: 1Gi上面的定义中,没有定义
selector属性,使用动态资源供应模式。创建过程的日志可以通过跟踪 Heketi pod 的日志。kubectl logs -f heketi-c7cbcd99f-xc774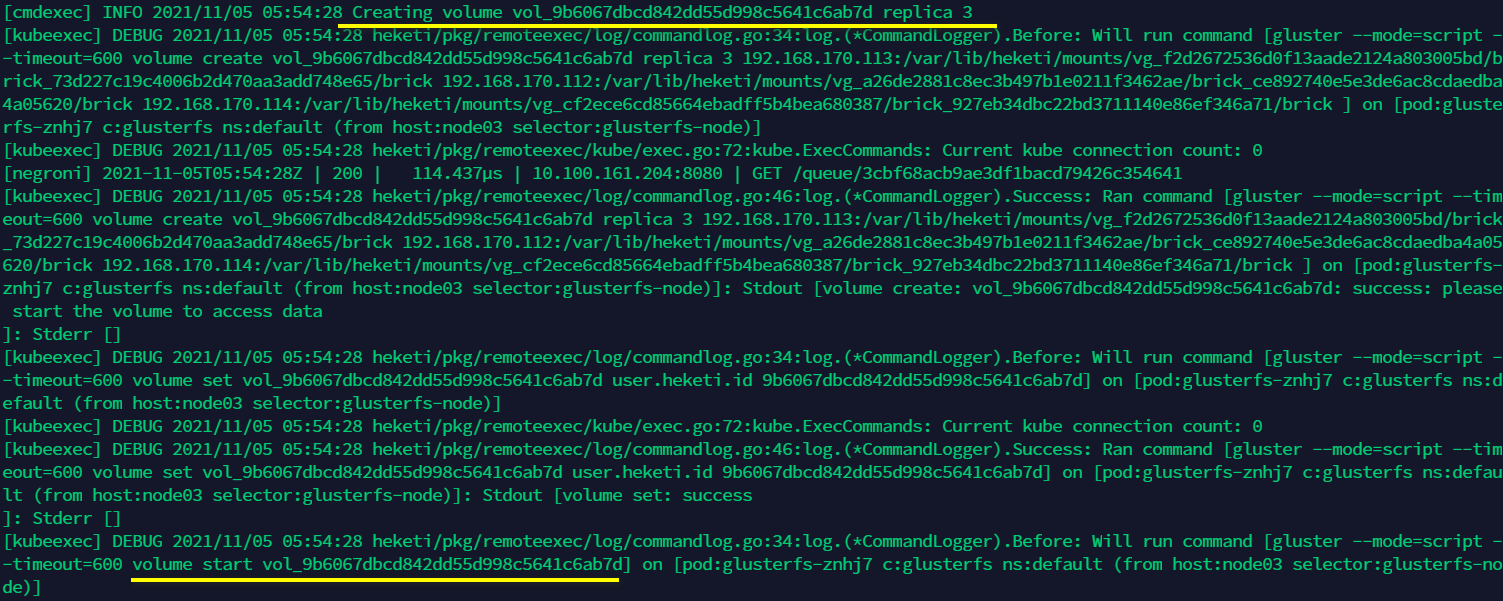
创建 PVC 成功后,再看看其状态,已经是
Bound状态:1
2
3[root@node01 k8s]# kubectl get pvc
NAME STATUS VOLUME CAPACITY ACCESS MODES STORAGECLASS AGE
pvc-gluster-heketi Bound pvc-990850cc-5d60-4ef5-9315-7318645a83f8 1Gi RWO gluster-heketi 16s查看 PV,可以看到,PVC 申请 PV 之后,heketi 创建一个 volume,然后将 volume 和 PV 绑定,并且是一对一的关系。
1
2
3[root@node01 k8s]# kubectl get pv
NAME CAPACITY ACCESS MODES RECLAIM POLICY STATUS CLAIM STORAGECLASS REASON AGE
pvc-990850cc-5d60-4ef5-9315-7318645a83f8 1Gi RWO Delete Bound default/pvc-gluster-heketi gluster-heketi 8m2sdescribe 一下这个 PV,看到里面的状态、 StorageClass 以及容量等信息,还有一些 GlusterFS 的配置,heketi 也帮助我们完成了。看到 annotation 的描述,“Dynamically provisioned PV”
1
2
3
4
5
6
7
8
9
10
11
12
13
14
15
16
17
18
19
20
21
22
23
24
25
26
27[root@node01 k8s]# kubectl describe pv pvc-990850cc-5d60-4ef5-9315-7318645a83f8
Name: pvc-990850cc-5d60-4ef5-9315-7318645a83f8
Labels: <none>
Annotations: Description: Gluster-Internal: Dynamically provisioned PV
gluster.kubernetes.io/heketi-volume-id: 9b6067dbcd842dd55d998c5641c6ab7d
gluster.org/type: file
kubernetes.io/createdby: heketi-dynamic-provisioner
pv.beta.kubernetes.io/gid: 2000
pv.kubernetes.io/bound-by-controller: yes
pv.kubernetes.io/provisioned-by: kubernetes.io/glusterfs
Finalizers: [kubernetes.io/pv-protection]
StorageClass: gluster-heketi
Status: Bound
Claim: default/pvc-gluster-heketi
Reclaim Policy: Delete
Access Modes: RWO
VolumeMode: Filesystem
Capacity: 1Gi
Node Affinity: <none>
Message:
Source:
Type: Glusterfs (a Glusterfs mount on the host that shares a pod's lifetime)
EndpointsName: glusterfs-dynamic-990850cc-5d60-4ef5-9315-7318645a83f8
EndpointsNamespace: default
Path: vol_9b6067dbcd842dd55d998c5641c6ab7d
ReadOnly: false
Events: <none>通过以上的操作,一个真正 PVC 就生成了,挂载到 pod 里面就可以使用了。
pod 使用 PVC
通过一个简单的 nginx pod 来使用 PVC,使用
persistentVolumeClaim来挂载 PVC。另外,pod 和 PVC 要在同一个 namespace 中才能使用。 比较简单,不展开了。

K8S集群安装动态存储 GlusterFS